

![Special Offer - Windows 10/11 S 5PC [Retail Online]](https://esafekeys.com/image/cache/catalog/2024/Win/win%2010-11-250x250.png "Special Offer - Windows 10/11 S 5PC [Retail Online]")
![Office 2016 Pro Plus 1PC [BIND]](https://esafekeys.com/image/cache/catalog/2024/office/office-2016-pro-plus-250x250.png "Office 2016 Pro Plus 1PC [BIND]")
![Power BI Professional 100PC for 1 Year [Retail Online]](https://esafekeys.com/image/cache/catalog/2024/power-bi-250x250.png "Power BI Professional 100PC for 1 Year [Retail Online]")
![Office 2021 Pro Plus 1PC [BIND]](https://esafekeys.com/image/cache/catalog/2024/office/office-2021-pro-plus-250x250.png "Office 2021 Pro Plus 1PC [BIND]")
![SQL Server 2016 Standard 1PC [Retail Online]](https://esafekeys.com/image/cache/catalog/office%20products/new/microsoft%20SQL%20esafe-1-250x250.png "SQL Server 2016 Standard 1PC [Retail Online]")
![Special Offer - Office 2019 Pro Plus 5PC [Retail Online]](https://esafekeys.com/image/cache/catalog/2024/office/sp-office-2019-pro-plus-250x250.png "Special Offer - Office 2019 Pro Plus 5PC [Retail Online]")
![Office 2016 Home & Business for 1 MAC [BIND]](https://esafekeys.com/image/cache/catalog/2024/office/office-home-and-business-250x250.png "Office 2016 Home & Business for 1 MAC [BIND]")


Microsoft encourages users to set up their Windows 11 devices with a Microsoft account as it offers several additional benefits, such as seamless integration with cloud services like OneDrive and Office, content synchronization between devices, and improved security features. However, some users still prefer the more traditional experience of using a local account. The issue is that Microsoft has made it increasingly difficult to set up Windows 11 without a Microsoft account.
Initially, the option to create a local account was removed from the setup process of the Home version of Windows 11. Now, even the Pro version does not offer this option during setup. Despite these changes, there are workarounds available that allow users to set up Windows 11 with a local account instead of a Microsoft account. These workarounds have been shared by users on platforms like Reddit.
In this guide, I will explain the various methods you can use to set up a new installation of Windows 11 without a Microsoft account.
To install Windows 11 without a Microsoft account, you will need to follow the traditional setup process and utilize one of the solutions available in the out-of-box experience (OOBE).
Please note that these instructions are for a clean installation, and it's essential to back up your computer before proceeding as the process will delete all existing data.
If you are setting up a new laptop or desktop that already has Windows 11 pre-installed, you can skip the initial setup steps and directly refer to the solutions for disabling the internet requirement or typing a local account during account creation in the OOBE.
It is important to be cautious while following these steps, and it is always recommended to have a backup of your data to avoid any data loss during the installation process.
To start a fresh installation of Windows 11, use these steps:
- Start the PC with Windows 11 USB flash drive.
- On the prompt, press any key to boot from the device.
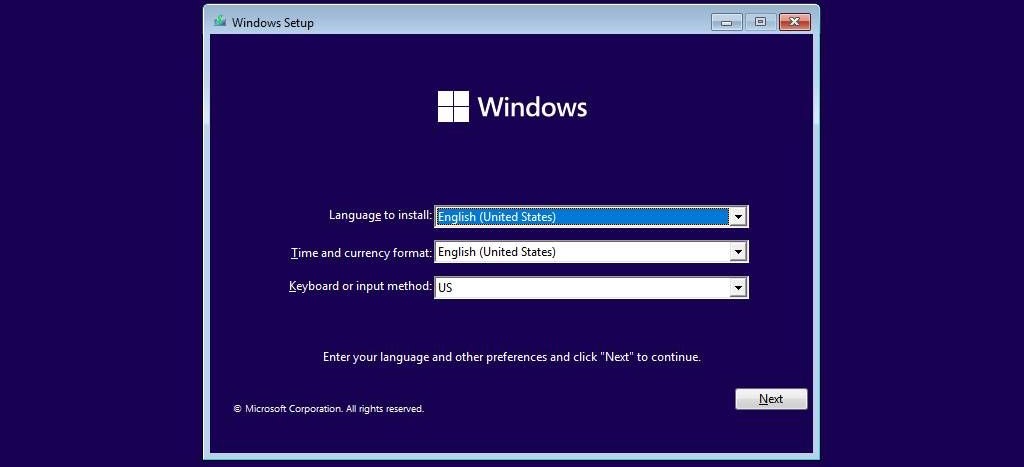
- On Windows Setup, click the Next button.
- Click the Install Now button.
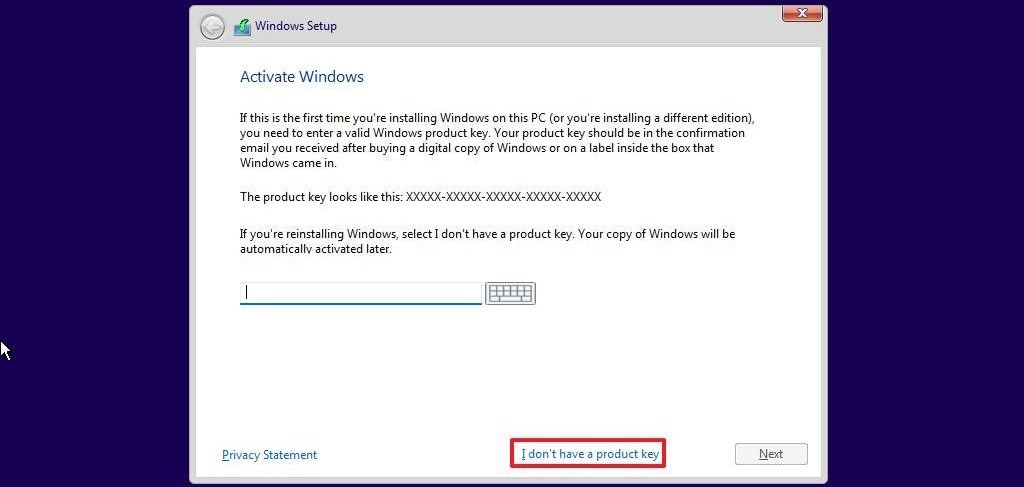
- If this is a reinstallation, click the "I don't have a product key" option to continue. Otherwise, enter the product key if this is your first time installing Windows 11.
- Click the Next button.
- Select the edition of Windows 11 (If applicable).
- Click Next.
- Select the "I accept the license terms" option to continue.
- Click Next.
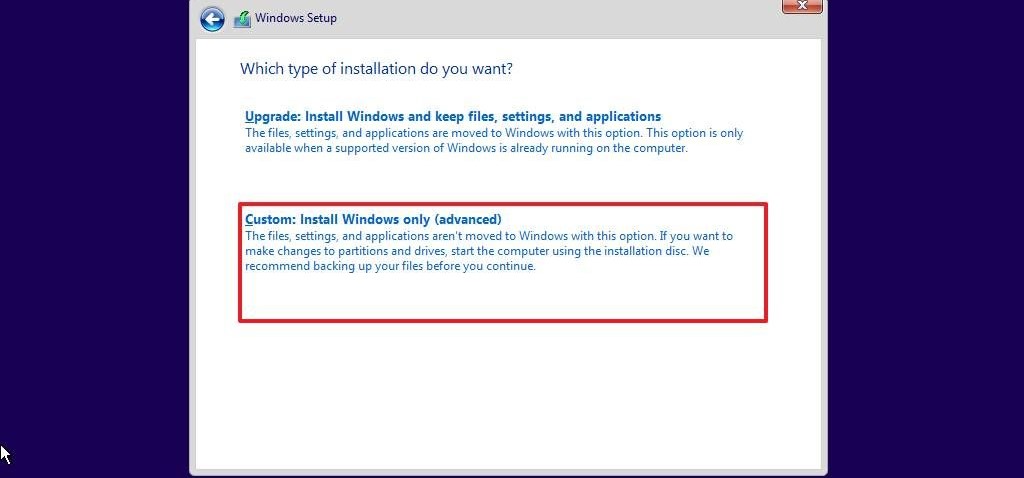
- Click the "Custom: Install Windows only (advanced)" option to continue with a clean installation.
- Select the partition with the current installation (usually "Drive 0"), and click the Delete button.
A quick tip: If "Drive 0" has multiple partitions, you must select and delete each partition to allow the setup to use the entire hard drive for the new setup. The Windows 11 setup will create the required partitions automatically during the process. It's also not necessary to delete the partitions on secondary drives. - Click the Yes button.
- Select the empty drive (Drive 0 Unallocated Space) to proceed with the installation.
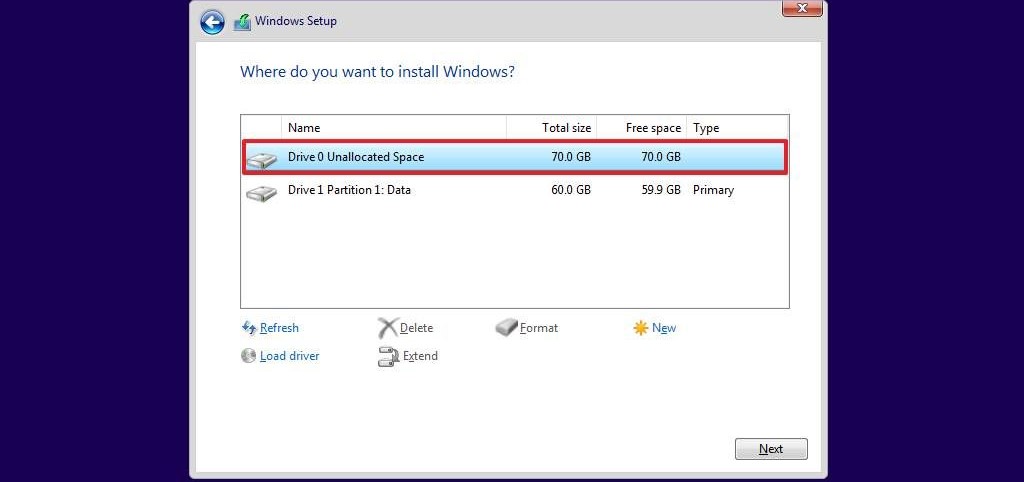
- Click the Next button.
After completing the initial steps, the installation process of Windows 11 will commence. During the out-of-box experience (OOBE), you have two options to proceed without a Microsoft account.
Disable Internet Requirement:
Follow the instructions provided to disable the internet requirement during the initial setup.
By disabling the internet, you can configure an account without the need for a Microsoft account.
Mistype Local Account Information:
Alternatively, you can intentionally mistype the local account information during the setup process.
When the system detects an error in the account information, it will generate an error message.
This error message will provide you with an option to create a local account instead.
By utilizing either of these methods, you can bypass the requirement for a Microsoft account and proceed with the creation of a local account for your Windows 11 installation.
Remember to exercise caution and ensure you follow the instructions accurately to achieve the desired outcome.
Out-of-box experience (OOBE) disable internet requirement
To set up a Windows 11 device without a Microsoft account disabling the internet requirements, use these steps:
1. Disconnect the Ethernet network cable (if applicable).
2. Select your region.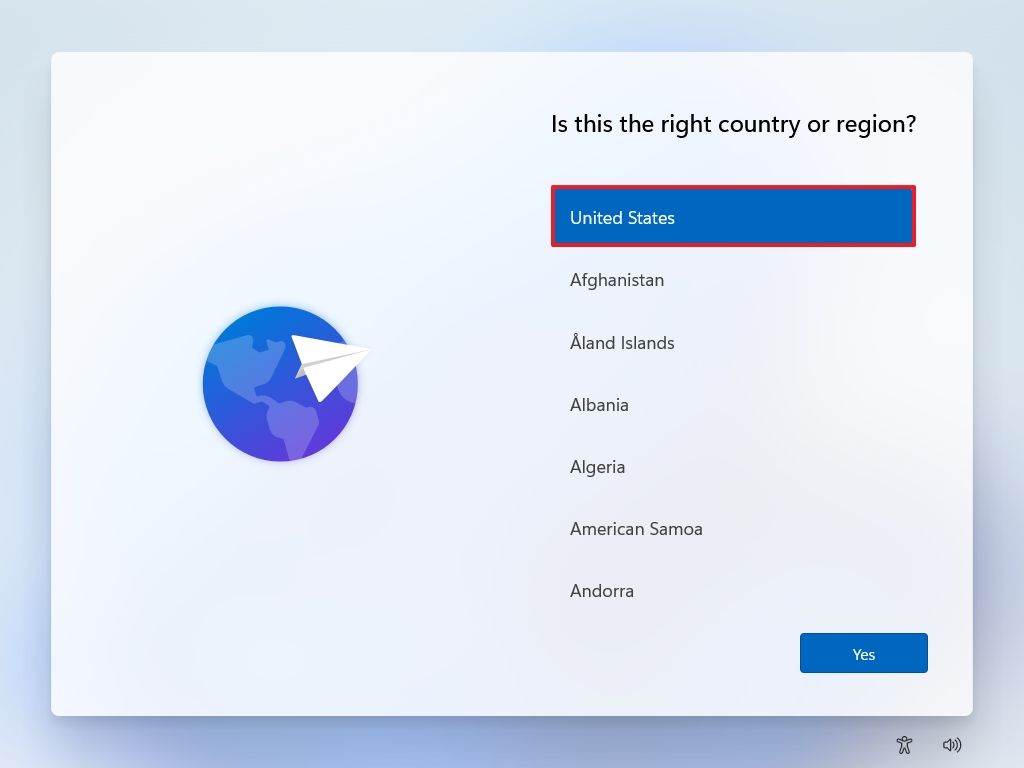
3. Click the Next button.
4. Select your keyboard layout setting.
5. Click the Yes button.
6. Click the Skip button.
7. (Optional) Confirm a computer name.
8. Click the Next button.
9. Choose the "Set up for personal use" option.
10. Click the Next button.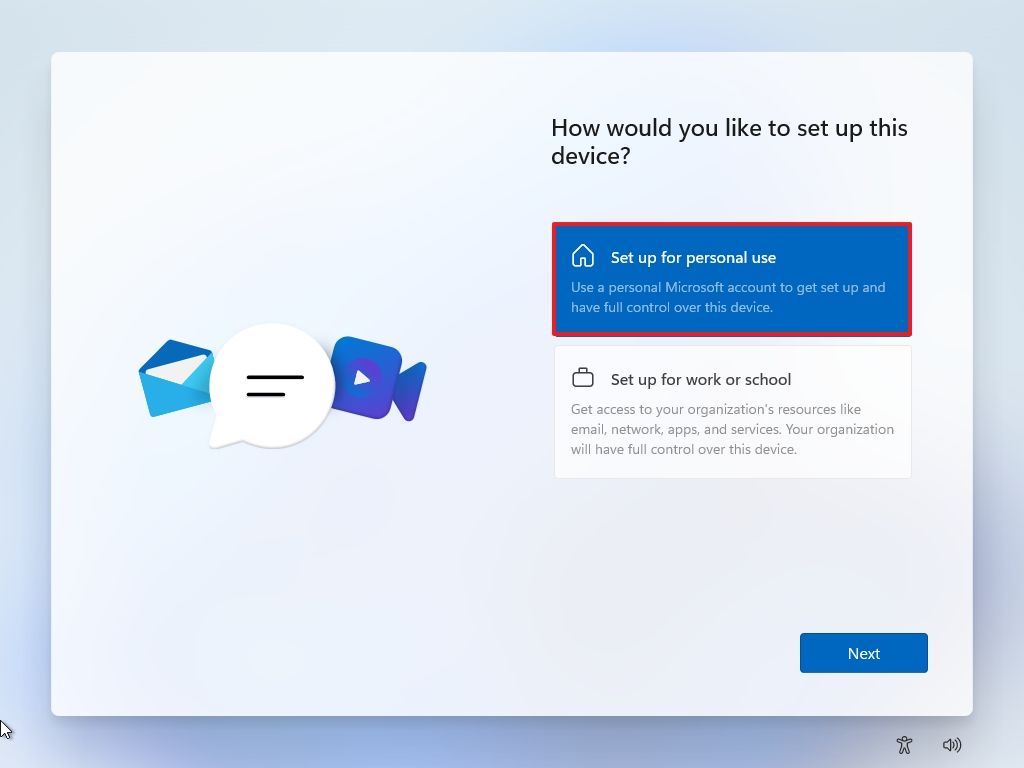
Quick note: This option is only available on Windows 11 Pro.
Once you complete the steps, you can continue with the steps below to configure an account without a Microsoft account.
Solution 1: Disable Internet requirements
On the "Sign in" page, use these steps:
1. Use the "Shift + F10" keyboard shortcut to open Command Prompt.
2. Type the following command to release the current network configuration and press Enter: oobe\bypassnro
Quick note: The command is a single phrase without spaces.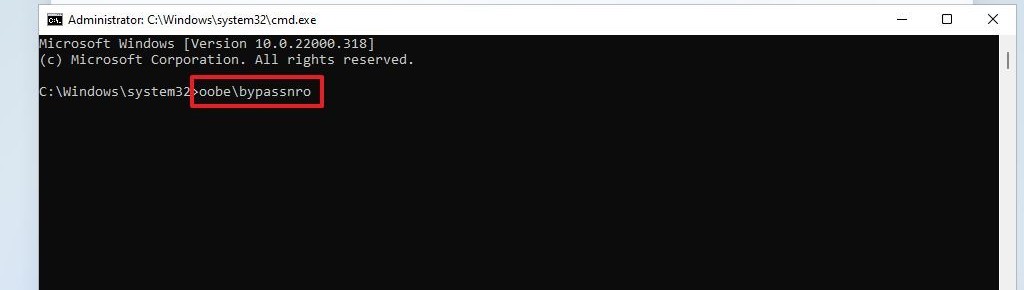
3. The computer will boot automatically, and you may need to start the out-of-box experience again.
4. Click the "I don't have internet" option.

Quick note: If you are setting up a Windows 11 Home, the setup may skip directly to the local account creation. On Windows 11 Pro, you will need to click the "I don't have internet" and "Continue with limited setup" options.
6. Confirm the name of the local account.
7. Click the Next button.
8. Create a password for the account.
9. Click the Next button.
10. Complete the three security questions to recover the account (if applicable).
11. Click the Next button.
12. Choose your privacy settings.
13. Click the Next button.
14. Click the Next button again.
Click the Accept button.
After you complete the steps, the out-of-box experience will restart,
letting you bypass the internet requirements to give you the option to
create a local account.
Solution 2: Disable Internet requirements
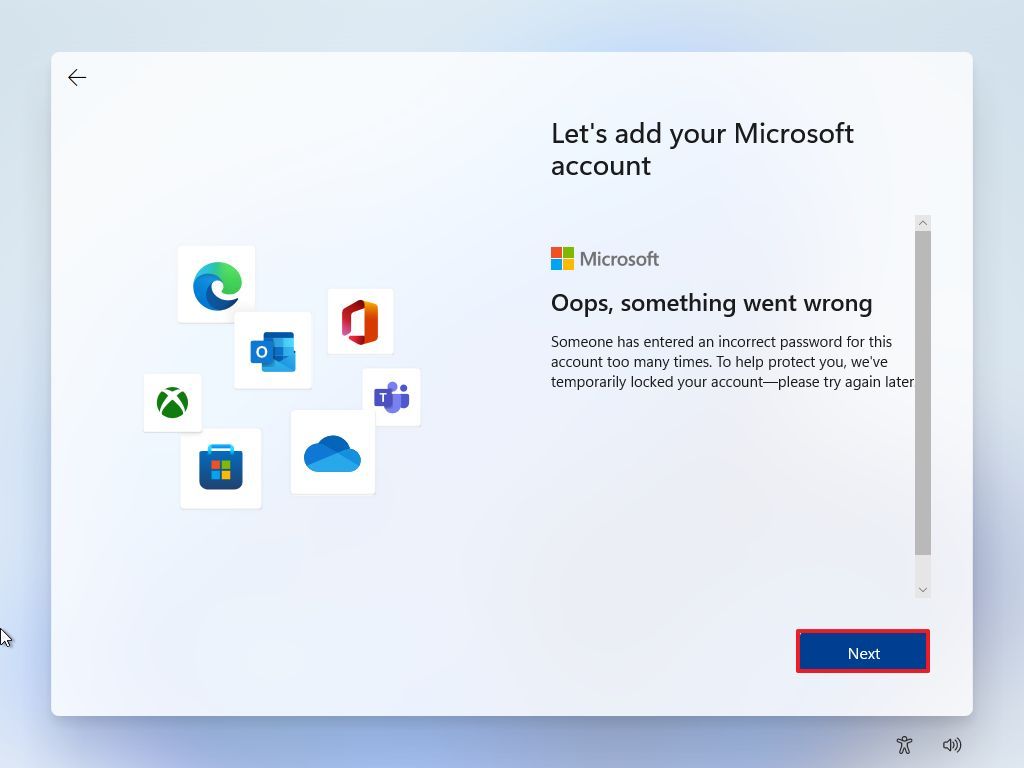
In the "Let's add your Microsoft account" page, use these steps:
- Confirm a local account username in the "Sign in" setting.
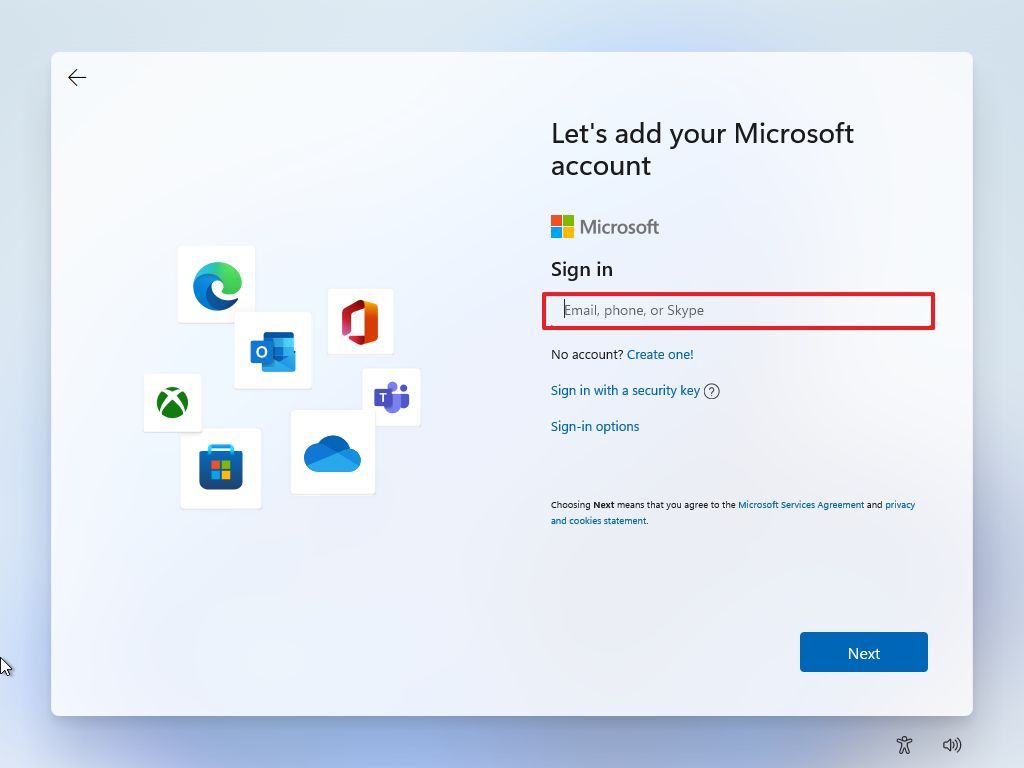
- Confirm a random password for the account.
- Click the Sign in button.
- Click the Next button on the "Oops, something went wrong" error page.
- Create a name for the local account.
- Click the Next button.
- Create a password for the account.
- Click the Next button.
- Complete the three security questions to recover the account (if applicable).
- Click the Next button.
- Choose your privacy settings.
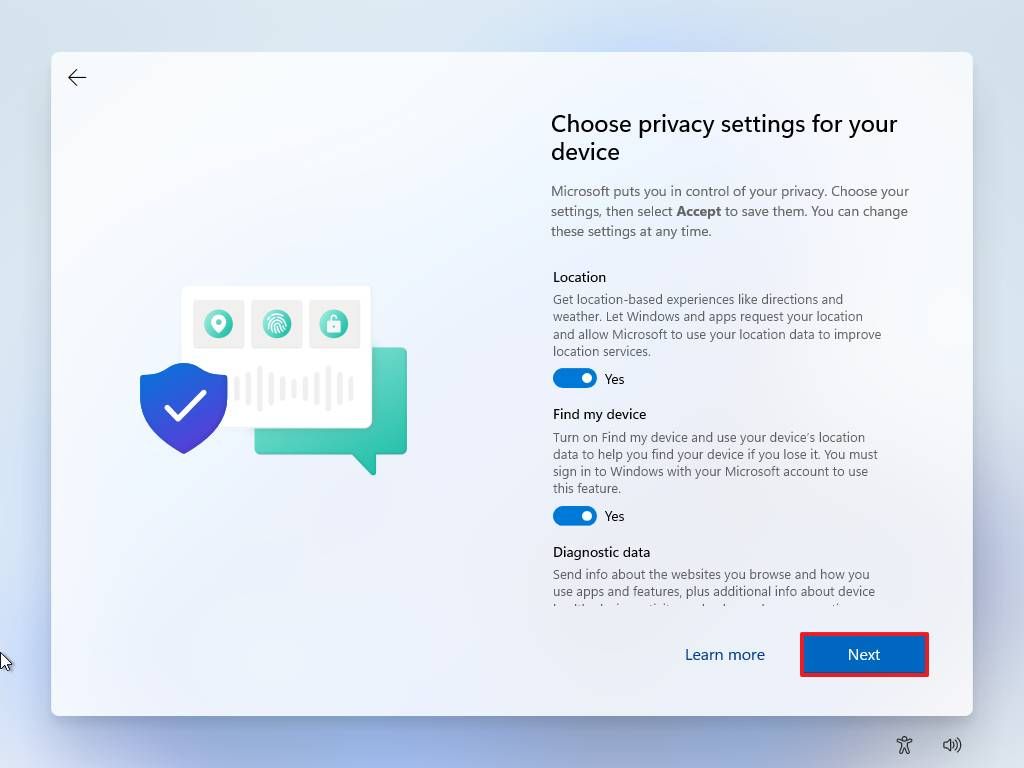
- Click the Next button.
- Click the Next button again.
- Click the Accept button.
Once you complete the steps, you will be able to continue the setup of Windows 11 without a Microsoft account.
Related Products
![Special Offer - Office 2021 Pro Plus 1PC [BIND]](https://esafekeys.com/image/cache/catalog/2024/office/spcial-office-2021-pro-plus-250x250.png "Special Offer - Office 2021 Pro Plus 1PC [BIND]")